Before you generate anything
3D Model From Images
How you turn an image into a 3D model depends on what you are holding. One photo of a pet and fourteen photos of a bracket are different problems with different answers, and two of the three answers are not this site. Five questions, then a straight verdict.
Which route should your 3D model from images take?
Your route
Single-image AI, which is what this site does
One photo, or several photos from one angle, is exactly the input a single-image model takes. It also covers a subject photogrammetry cannot: Polycam's subject table gives photogrammetry no support at all for moving subjects such as people and animals, and a single frame does not care that they moved.
What it will not give you: The unseen sides are generated rather than observed. Users comparing these tools against real scans describe them as inventing geometry on the unseen sides and drifting from the real object, and that is also where open holes and non-manifold geometry usually come from. Your photo's lighting comes along too: the authors of one widely used open model state, in the limitations section of their paper, that it does not separate lighting effects, leaving baked-in shading and highlights from the reference image.
For 3D printing you need a watertight mesh in a format a slicer reads. Convert an image to a printable STL file and then patch the open holes in the free mesh repair tool.
Side by side
Three routes, and only one of them is this site.
These are not three settings of the same thing. Polycam describes photogrammetry as finding matching points between images to calculate depth and position, which is why it wants heavy overlap and why it fails when two photos do not share enough common ground. A single-image model infers instead, because there is only one view to work from. Modelling it yourself does neither: it starts from numbers you took off the real object, so what limits its accuracy is your measuring rather than the reconstruction.
| Route | What it needs from you | Best for | Not for |
|---|---|---|---|
| Single-image AI (this site) | One image. The generation request this site sends carries an images array with exactly one element in it, so a second photo would not be read even if you had one. | A quick usable asset from a few casual photos, where a real scan would fail or not be worth the effort. Also the only route here that handles a subject that moves: Polycam's subject table gives photogrammetry no support at all for people and animals, and one frame does not care that they moved. | Real measurements, and anything archival. The unseen sides are generated rather than observed, which users comparing these tools describe as inventing geometry on the unseen sides and drifting from the real object. The lighting in your reference photo is baked in as well, by the authors' own account. |
| Photogrammetry | A capture session, not a photo. Polycam calls 20 photos the minimum and a starting point rather than a goal, at 70 to 75 percent overlap between consecutive shots, walking completely around the object with three to four feet of clearance including above and below, under soft even light. And if the background is blurry, alignment fails. | Fidelity to a real object. Polycam lists a photogrammetry mesh as best for 3D printing, engineering, architecture, and insurance documentation, and a practitioner who runs both routes puts it as a proper scan with enough coverage winning on dimensional fidelity every time. | Anything that moves, and anything shiny, clear, or featureless without physical preparation first. Polycam's own remedies are to cover shiny surfaces with paper and add a scribble pattern, matte-spray transparent objects, and chalk-spray featureless ones. |
| Modelling it yourself in CAD | The object in hand, a way to measure it, and enough of a sketch-and-extrude workflow to draw a profile. Your photos become reference rather than input. | Simple extruded and mechanical parts, and anything where the dimensions have to be right. It is what several people answering this question about printing brackets told the person asking it, one of them describing a bracket as a sketch, an extrude, and thirty seconds. | A one-off where learning the tool costs more than the result is worth. In that same thread, the commenter who called CAD ultimately the better way to go allowed that for a one-off, generating the model is not a bad way to get one. |
If photogrammetry is your route, these are the tools that take a photo set
No ranking and no affiliate arrangement: this site earns nothing if you go. Every capture requirement quoted on this page comes from the Polycam object-mode capture guide, which is the clearest published account of what a capture actually demands, and its companion page on preparing to scan. Meshroom, the free AliceVision front end is the open-source option if you would rather run the pipeline yourself. If you need true dimensions out the far end, Agisoft documents the scale-bar workflow that turns a reconstructed shape into measured geometry.
It is a decision, not a gap. Multi-image input was measured here before it was declined: three images took 26.3 seconds and five took 29.4 seconds, both inside the run to run spread of a single image, so cost was never the objection. The objection was that the authors of one open model describe multi-image conditioning as a tuning-free algorithm without a specially trained model, and say it may not give the best results for all input images. That is not a claim that multi-image is worse, and it is not repeated here as one. It is the reason there was nothing to promise. Sending one image is what this site does on purpose, which is why the picker above will send you elsewhere when a real capture is the right input.
From this pipeline
What one image actually produces.
Both pairs below are outputs of this site's own generator, shown beside the single image each one came from. The left image is the entire input.
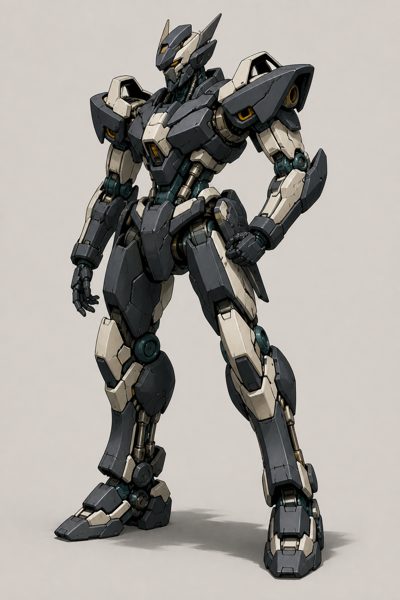 Input
Input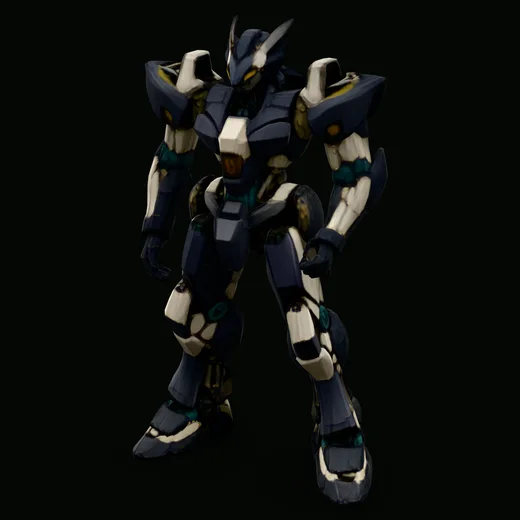 Generated mesh
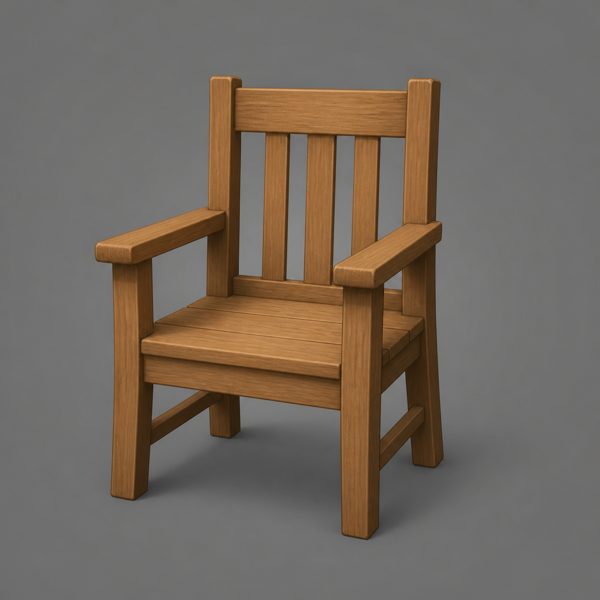 Input
Input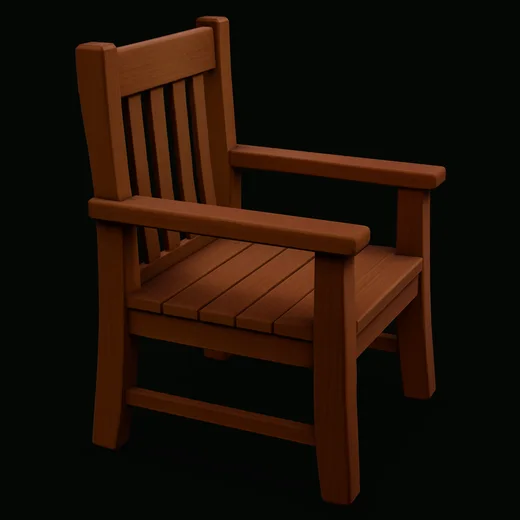 Generated mesh
The honest part
When neither photo route works.
Two cases send people away from both photo routes, and the tool pages competing for this search mention neither. In the first of them there is a third answer nobody selling a generator wants to give: model it yourself.
You need the dimensions to be right
A single photograph does not contain the information needed to recover real-world size. Scale is lost in perspective projection when the image is formed, which is a property of photography rather than a defect of any particular tool, and it is why depth models are trained in a scale-invariant space to begin with. Photogrammetry is in a better position but not automatically in a correct one: it recovers shape from the geometry of your images, and you supply the real-world size yourself, by giving the software a measured distance or a known-length scale bar. Agisoft describes the workflow as measuring some of the linear distances between coded targets before or after the shooting session, which means you have already got a ruler out.
So if you were going to measure anyway, ask whether the photo route is buying you anything. For a simple extruded or mechanical part it often is not. That is not our idea: somebody trying to print custom brackets from manufacturer photos without learning CAD got told to learn a little CAD instead, in as many words, and the line that stuck was sketch the profile, extrude, thirty seconds. He got a usable bracket in the end too, reporting fifteen minutes of cleanup to make the generated mesh solid. Fifteen minutes of repair against thirty seconds of sketching only runs one way for a shape you could draw, and it runs the other way as soon as the shape is one you could not.
The surface is glossy, transparent, or featureless
Photogrammetry works by finding matching points between overlapping photos, so a surface with nothing to match on gives it nothing to work with. That does not close the route, and it is worth being accurate about this rather than dramatic: Polycam marks reflective and transparent subjects as capturable with extra preparation rather than impossible, and is specific about the remedy, which is physical. Cover mirrors and shiny surfaces with paper and add a scribble pattern, use matte spray on transparent objects, and lightly coat featureless surfaces such as plain plastic, bare metal, or blank packaging with chalk spray, which wipes off afterwards. Nobody comparing these routes is usually told that the scanning path may begin with spraying their object.
So the real question on a shiny object is whether you are willing to put something on it. If you are, and you can take a full set, photogrammetry is still the better route. If you are not, a single-image model is the option that does not ask, and it will hand you a mesh without any preparation at all. That is a real convenience and it is not the same as an answer: the geometry is inferred rather than measured, so you get a shape that reads as your object rather than a copy of it. Someone who runs both routes on small objects on a turntable summed the comparison up better than we can, describing a proper scan with enough coverage as winning on dimensional fidelity every time, the interesting question as what you get from a handful of casual photos where a real scan would fail or not be worth the effort, and the case neither one handles well as still being shiny featureless stuff.
Frequently asked questions about making a 3D model from images
Is it realistic to get a good result starting from just one photo?
It depends entirely on what the result has to do. For a visual asset, a prop, a background object, or a base to sculpt over, one photo is a reasonable starting point, and it is what this site takes. For a part that has to fit something, no. A single photograph does not carry real-world size, because scale is lost in perspective projection, and the sides the camera never saw are generated rather than observed. People pushing it toward production work are blunt about that gap. Someone asked this exact question while trying to get a clean printable model out of one image, and the reply that gathered the most votes was a flat no.
Sources: the thread that asks it · why one view loses scale
Would using more photos help, or is photogrammetry overkill at this scale?
Not on this site, and possibly not in between either. Sculptly sends exactly one image to the model, so a second photo would not be read. The authors of one widely used open image-to-3D model describe its multi-image mode as a tuning-free algorithm without a specially trained model, and say directly that it may not give the best results for all input images, so more photos are not automatically better even where the option exists. Photogrammetry is a different bargain rather than a larger version of the same one. Polycam puts the floor at 20 photos with 70 to 75 percent overlap between consecutive shots, and calls 20 a starting point rather than a goal. Two or three extra snaps land in the gap between the two routes.
Sources: the authors of one open model on multi-image input · Polycam on photo count and overlap
How do I make sure the measurements are correct?
You measure the object. Neither photo route hands you correct dimensions on its own. A single image has no real-world scale to recover, and photogrammetry recovers shape from image geometry while you supply the size separately, by giving the software a measured distance or a known-length scale bar. Agisoft documents this as measuring some of the linear distances between coded targets before or after the shooting session. If the object is a simple extruded or mechanical part, the fastest honest answer is often to take the measurements and model it directly. That is what several replies told the person who asked this while trying to print brackets: sketch the profile, extrude, done.
Sources: Agisoft on coded targets and scale bars · the brackets thread
What happens to the unseen sides of the object?
They are generated, not observed, and it is the most important thing to understand before printing anything. This is user testimony rather than a vendor statement, and it is worth being precise about that. The people who compare these tools against real scans are the ones who report it: one describes a tool as inventing geometry on the unseen sides and drifting from the real object, another puts the invented share of the result very high indeed. No model documentation says it, and this page will not pretend otherwise. The reference photo also brings its lighting along, and that part the authors of one model do state: it does not separate lighting effects, so shading and highlights end up baked into the asset.
Sources: the comparison thread · the stronger claim, in its own thread · the authors on baked-in lighting
How dimensionally accurate is photogrammetry with a decent smartphone camera?
It can be far better than a single-image route and it is still not a specification. Polycam lists a photogrammetry mesh as best for 3D printing, engineering, architecture, and insurance documentation, and one practitioner who runs both routes says a proper scan with enough coverage wins on dimensional fidelity every time. But accuracy with a phone in your hand is not a number the tools publish. The figures that circulate, such as one to two millimetres, are individual practitioners reporting their own captures, not vendor specifications, and they arrive with conditions attached: markers of a known dimension, bright light, non-reflective and feature-rich subjects, and a steady hand.
Sources: Polycam on what a photogrammetry mesh is best for · the practitioner comparing both routes · where the millimetre figures come from
Why do free image to STL websites just make a bumpy surface from my picture?
Because some of them produce a relief of your picture rather than a model of the object, and a relief is not a reconstruction. The person who asked this while trying to print custom brackets described that category exactly: they basically just make a bumpy surface from your picture, not useful if you need an actual 3D object. He was not describing every site, and neither are we. The check takes five seconds and works on any result, including the ones from this site: rotate the model ninety degrees. If it becomes a flat slab with texture on one face, it is a relief. If it has depth from every angle, something built a volume, and the next question is whether the sides your photo never showed are right.
Sources: the thread he wrote it in
Generating a model uploads your image to our servers. Make a 3D model from an image on the generator → · Convert an image to a printable STL file →
These two run entirely in your browser, on any GLB file, whether or not it was made here. Patch open holes in a mesh → · Inspect a GLB →
These two are written import guides rather than tools. Import a generated model into Unity → · Import a generated model into Blender →
Free tools and guides
Other ways to get a model from a picture
generate a 3D model from one image for free · prepare a multicolor 3D print from an image · make a Gaussian splat from an image · image to 3D tools compared: Sculptly, Meshy, Tripo and Rodin · Meshy vs Tripo vs Sculptly cost per model compared
Free tools that run in your browser
combine GLB models into a single scene · voxelize a GLB into blocks · make a two-part mold block from a watertight GLB · turn a photo into a printable lithophane · estimate the cost of a 3D print · shrink an STL file by converting to 3MF
Guides
why single-image meshes have holes and how to patch them · four pitfalls when importing a generated GLB into Blender · why the tool pages state their own limits